After rearranging our living room . . . we wanted to add a little light to the foyer. We have pot lights installed but something that hangs down into the space would be ideal. I always loved these Allan and Roth lights from Lowes. When I saw them installed in a friends new home, and they looked so amazing, I had to pick one up for our manor. They come with amazing Edison light bulbs . . . but the orangey glow was a bit too much for our little entrance so we swapped it out for an incandescent bulb, but have a couple of those fancy shaped florescent bulbs (plumen) on order (they are green and stylish).
We used a pot light converter kit. It was really easy. All the instructions are in the package it was simple.
Next, if you follow us on Instagram you would have caught my recent photos from a trip to Homesense. I shared a driftwood wreath I purchased. I was finally able to get it up and on the door. I've been looking for a summer wreath but wanted to stay away from silk flowers this year. Driftwood was perfect!
Lastly we need to add another plant to the front foyer, because our old piece lily (seen in our house tour) is way way way too big now, and I am also thinking of adding display rails to hold pictures or mail, but of course I will post about it when it happens.
Showing posts with label Hallways. Show all posts
Tuesday, May 14, 2013
Wednesday, November 14, 2012
Baby, it's cold outside . . . because we have no back door.
Baby . . . it's really really cold outside. In case you didn't know we live in Canada. And while it's the mildest part of Canada . . . it's still Canada and Mid-November is COLD!!!!!!
I'll back up and give you the whole story. This summer we bought a beautiful french door in very rough shape for $45! I never loved our builder basic back door and when I found a solid wood, double paned french door at a salvage yard for $45, I jumped on it.
The key to this story is . . . we bought the door this summer. Summer the perfect season for projects that involve your house having no door! We didn't get around to it until this weekend, in the middle of Fall, with the temperature hovering just above freezing, right on the tail end of a mean case of strep throat and a bad cold.
The reason for our delay was, one part over excitement, and one part terrible measuring skills (on my part). You see . . . I got so excited I didn't notice that it needed WAY more work than I thought. I also blame over excitement for my measuring the door wrong . . . turns out it was 1" too wide and 1" too short. Errrr . . . oops ;).
We considered returning the door, we ran around the house trying to find another opening, we cried a little (just kidding . . . only Lee cried . . . just kidding no one cried).
Lee decided that we could use the table saw and trim the door down half an inch on each side. Then a trip to home depot for a small piece of Fir 1" thick. Lee attached it to the bottom of the door, using glue and screws! Since it's the bottom of the door no one would ever know! ;)
Okay, all is fixed here's how it went down.
This post could have been titled "15 Hours of my life I'll never get back" or "Seriously can you believe that we spent 15 hours on this door" or "OUCH, my back".
We really did spend 15 hours on this door. First we had to clean years of dirt and grease off of the glass, then we had to scrap off old paint and stain from the window panes. Just me, a small razor and every square millimeter of each pane of glass, front and back. Lee taped of each pane of glass, perfectly so that no stain would get on the glass.
Then we sanded the door, using a small orbit sander for the face of it, and doing all of the trim around the windows by hand!
Then we Stained it! I chose 'Dark Walnut' for the inside because it was exactly the same color as the floor, I wanted it to look like the floor color ran right up on to the door. The other side of the door we painted the same color as the outside trim.
Next, Lee cut out the door knob cut outs using a jig you can buy at Home Depot for $20 . . . word is, totally worth the $20 investment.
An in case you're wondering the $45 for the door, the $20 for the jig, the $6 pot of stain, and the 15 hours of manual labor . . . all completely, totally, utterly worth every penny and every minute!
Judge for yourself, before:
After:
I think that in New Build Homes (aka. Builder Basic Homes), it's the special touches that add the charm and keep your home from looking like a big beige box. There was nothing 'wrong' with the old door, in fact it had some nifty little blinds between the glass, but it was a bit on the boring side, and I really didn't like the plastic trim holding the glass in.
This wood feller takes my breath away.
I LOVES HIM! (Yes I meant to add the extra S).
Speaking of things I LOVE! Our New Door knob! While I think that the lever style door handles (like the one in our before picture) are probably a bit more functional . . . but I LOVE a oil rubbed bronze Knob! Oh the simplicity! (sorry for the bad picture I was having 'camera issues'/ 'camera operator issues'.
And Yes . . . that chair is wearing socks (more on that later).
I'll back up and give you the whole story. This summer we bought a beautiful french door in very rough shape for $45! I never loved our builder basic back door and when I found a solid wood, double paned french door at a salvage yard for $45, I jumped on it.
The key to this story is . . . we bought the door this summer. Summer the perfect season for projects that involve your house having no door! We didn't get around to it until this weekend, in the middle of Fall, with the temperature hovering just above freezing, right on the tail end of a mean case of strep throat and a bad cold.
The reason for our delay was, one part over excitement, and one part terrible measuring skills (on my part). You see . . . I got so excited I didn't notice that it needed WAY more work than I thought. I also blame over excitement for my measuring the door wrong . . . turns out it was 1" too wide and 1" too short. Errrr . . . oops ;).
We considered returning the door, we ran around the house trying to find another opening, we cried a little (just kidding . . . only Lee cried . . . just kidding no one cried).
Lee decided that we could use the table saw and trim the door down half an inch on each side. Then a trip to home depot for a small piece of Fir 1" thick. Lee attached it to the bottom of the door, using glue and screws! Since it's the bottom of the door no one would ever know! ;)
Okay, all is fixed here's how it went down.
This post could have been titled "15 Hours of my life I'll never get back" or "Seriously can you believe that we spent 15 hours on this door" or "OUCH, my back".
We really did spend 15 hours on this door. First we had to clean years of dirt and grease off of the glass, then we had to scrap off old paint and stain from the window panes. Just me, a small razor and every square millimeter of each pane of glass, front and back. Lee taped of each pane of glass, perfectly so that no stain would get on the glass.
Then we sanded the door, using a small orbit sander for the face of it, and doing all of the trim around the windows by hand!
Then we Stained it! I chose 'Dark Walnut' for the inside because it was exactly the same color as the floor, I wanted it to look like the floor color ran right up on to the door. The other side of the door we painted the same color as the outside trim.
Next, Lee cut out the door knob cut outs using a jig you can buy at Home Depot for $20 . . . word is, totally worth the $20 investment.
An in case you're wondering the $45 for the door, the $20 for the jig, the $6 pot of stain, and the 15 hours of manual labor . . . all completely, totally, utterly worth every penny and every minute!
Judge for yourself, before:
After:
I think that in New Build Homes (aka. Builder Basic Homes), it's the special touches that add the charm and keep your home from looking like a big beige box. There was nothing 'wrong' with the old door, in fact it had some nifty little blinds between the glass, but it was a bit on the boring side, and I really didn't like the plastic trim holding the glass in.
This wood feller takes my breath away.
I LOVES HIM! (Yes I meant to add the extra S).
Speaking of things I LOVE! Our New Door knob! While I think that the lever style door handles (like the one in our before picture) are probably a bit more functional . . . but I LOVE a oil rubbed bronze Knob! Oh the simplicity! (sorry for the bad picture I was having 'camera issues'/ 'camera operator issues'.
And Yes . . . that chair is wearing socks (more on that later).
I Hope you like the door as much as we do. My favorite moment of any project is when Lee looks at the finished project and says . . . "Oh Wow, you were right that is SO much better", maybe it's just the "You're Right" part ;).
Taking a second look at these photos, the actual door color is a little less "redish" than the photos. It's closer to walnut color, than the cherry color it's showing.
Friday, August 24, 2012
I'm a Basket Case
Well . . . only a little.
I did a quick basket change up on our front hall console! I wanted something a little more textural and neutral. I'm really happy with them!
In case you're wondering . . . we keep candles and candle holders in the left basket and fish supplies in the right. And the BIG Peace Lily that usually lives beside the console has made it's way on to the front porch for the summer.
Check back later this afternoon for another post . . . it felt like a 2 post kind of day!
I did a quick basket change up on our front hall console! I wanted something a little more textural and neutral. I'm really happy with them!
In case you're wondering . . . we keep candles and candle holders in the left basket and fish supplies in the right. And the BIG Peace Lily that usually lives beside the console has made it's way on to the front porch for the summer.
Check back later this afternoon for another post . . . it felt like a 2 post kind of day!
Tuesday, August 21, 2012
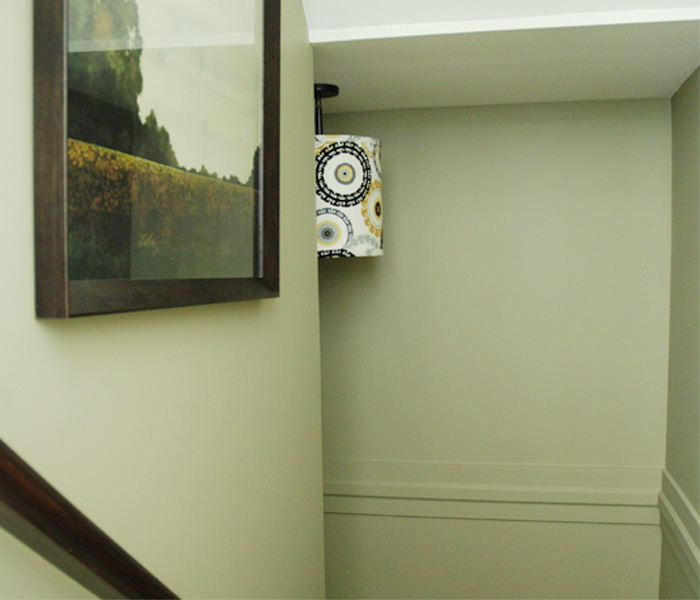
$6 Lamp Shade turned into a Pendant for the Basement Stairwell
I really just gave away my entire post in that title! Seriously . . . there was NO creative or clever play on words, no well thought out Puns, nothing! I laid all my cards on the table in the title. ;)
So, here it is . . . my $6 (+ fabric) shade as a pendant!
Please excuse the pictures . . . it's a really tight, dark space to take photos in!
We had an old light fixture lying around the house for a while (it was originally a small pendant light with a glass shade that broke, it was also previously chrome but Lee sprayed it oil rubbed bronze so that it would match the sconce we added in the stairwell last spring. It was really simple to do, we just ran the wires through the middle of the shade and the shade rests on top of the fixture. Lee was able to install it just like any other light.
We still plan on adding a diffuser, but it will probably be something we have to order online because I've had NO luck finding one in a store!
I'm so happy with how it turned out . . . I'm even more happy because we no longer have to look at the ceiling version of THIS:
Basement Checklist:
So, here it is . . . my $6 (+ fabric) shade as a pendant!
Please excuse the pictures . . . it's a really tight, dark space to take photos in!
We had an old light fixture lying around the house for a while (it was originally a small pendant light with a glass shade that broke, it was also previously chrome but Lee sprayed it oil rubbed bronze so that it would match the sconce we added in the stairwell last spring. It was really simple to do, we just ran the wires through the middle of the shade and the shade rests on top of the fixture. Lee was able to install it just like any other light.
We still plan on adding a diffuser, but it will probably be something we have to order online because I've had NO luck finding one in a store! I'm so happy with how it turned out . . . I'm even more happy because we no longer have to look at the ceiling version of THIS:
Basement Checklist:
Finish Drywall, and PaintAdd sconce to stairwellAdd art workAdd pendant light to stairwellAdd Deer HeadFix Hot Water Tank Valve- Add diffuser to the pendant shade!!
- Rip out Carpet and lay down wood or laminate flooring.
- Add a grouping of artwork on the main wall. (Important because it's the first thing you see when you open the door.
Friday, August 17, 2012
More Basement Progress
I've had some seriously lucky finds at the thrift store lately . . . first there was the coat tree, and now there's a framed watercolor landscape painting for . . . $9.99. Where else can you get a large (over 2 feet wide) watercolor, framed (with paper on the back and everything) for $9.99.
Of coarse the HUGE bonus being I LOVE IT! I would have paid a lot more for it and I'm seriously so thrilled to have it hanging up in our home.
I racked my brain trying to figure out a place to put in on our main floor but due to our super open concept floorplan, wall space is severely limited! So into the basement stairwell it went!
I didn't think I'd like it there as much as I do, but the wood frame matches the wood handrail. Also because I love seeing watercolors up close, and you are definitely UP CLOSE when viewing this one!
Hope everyone has a great Weekend!!!! See you back first thing Monday Morning with some new DIY's from our week off!!
Of coarse the HUGE bonus being I LOVE IT! I would have paid a lot more for it and I'm seriously so thrilled to have it hanging up in our home.
I racked my brain trying to figure out a place to put in on our main floor but due to our super open concept floorplan, wall space is severely limited! So into the basement stairwell it went!
I didn't think I'd like it there as much as I do, but the wood frame matches the wood handrail. Also because I love seeing watercolors up close, and you are definitely UP CLOSE when viewing this one!
Hope everyone has a great Weekend!!!! See you back first thing Monday Morning with some new DIY's from our week off!!
Wednesday, August 15, 2012
I keep my Skeletons in the Basement
Some people keep their skeletons in the closet, we keep ours in the basement . . . and by skeletons I mean THIS: Da Da Daaaaaaa!
This stripy mess is also known as the carpet in our basement! The worst part is, it's new! Somebody outside of the 70's chose this carpet, installed it, then stepped back and said "Yup that looks good!" We were lucky enough to get in and make some choices while our house was being built, but please understand that THIS WAS NOT MY CHOICE!!!! hehe
During our Most Productive Weekend ever Lee tackled some much needed drywall and baseboards in the basement.
So now when you walk down the basement steps you see this:
Someday, soon hopefully, we'll replace the carpet in the basement but for now it has to stay.
I added a deer head that my mom bought for us last Christmas, she picked it up from Home Hardware for $25, it's actually a Christmas decoration and was covered in sparkles. We rubbed off as many of the sparkles as possible then spray painted it white.
We also added a couple of framed photos of our little Max and our first puppy Olive.
On the left is our Utility Closet, it goes all the way under the steps which is where we store a lot of our seasonal items. It also holds our Hot Water Tank and our furnace.
On the right is the home of our future gym. It just an empty room now but with a new floor, some mirrors, a bench and treadmill we'll have our own small home gym!
I hope that you can see past the carpet, although if you can you'll be one step ahead of me because I cannot! We're planning to start work on the gym this fall, just in time to work off some Thanksgiving Dinner! :) hehe
This stripy mess is also known as the carpet in our basement! The worst part is, it's new! Somebody outside of the 70's chose this carpet, installed it, then stepped back and said "Yup that looks good!" We were lucky enough to get in and make some choices while our house was being built, but please understand that THIS WAS NOT MY CHOICE!!!! hehe
During our Most Productive Weekend ever Lee tackled some much needed drywall and baseboards in the basement.
So now when you walk down the basement steps you see this:
Someday, soon hopefully, we'll replace the carpet in the basement but for now it has to stay.
I added a deer head that my mom bought for us last Christmas, she picked it up from Home Hardware for $25, it's actually a Christmas decoration and was covered in sparkles. We rubbed off as many of the sparkles as possible then spray painted it white.
We also added a couple of framed photos of our little Max and our first puppy Olive.
On the left is our Utility Closet, it goes all the way under the steps which is where we store a lot of our seasonal items. It also holds our Hot Water Tank and our furnace.
On the right is the home of our future gym. It just an empty room now but with a new floor, some mirrors, a bench and treadmill we'll have our own small home gym!
I hope that you can see past the carpet, although if you can you'll be one step ahead of me because I cannot! We're planning to start work on the gym this fall, just in time to work off some Thanksgiving Dinner! :) hehe
Wednesday, July 11, 2012
Come in . . . hang your coat up!
Come on in . . . hang up your coat . . . on our new COAT TREE!
I'm not sure if I've ever squeaked out so much joy from $4? On a recent trip to our local secondhand store (Salvation Army) I found a very wobble-y, very gold coat tree. We've been looking for a coat tree since we moved in a year and a half ago but it wasn't a necessity so it always got pushed down the list. Luckily it did or we would have spent way more then $4.
Here's what the big gold beast looked like before:
and this is how he looks now . . . can you say tall, dark and handsome!?
Is there anything that a can of oil rubbed bronze spray paint can't fix?? (side note: the coat hook behind the tree will get moved)
Now for $4 he wasn't without his issues. Besides the gold finish, it was missing one pipe topper and one screw. Lee was able to fix the screw by putting in one of our own, but the small ball is missing for good, we just turned that side towards the wall! ;) Fixed!
I think my favorite parts now, were my least favorite parts before we sprayed it. The Plastic Topper and Plastic fastener piece (it holds the two sections of pole together). They are made of super cheap plastic and when they were still gold it was really obvious, but in oil rubbed bronze they look fantastic!!!
I'm so glad that it all worked out, like I said we've been hoping to get a coat tree for that spot for a while now. We both had some serious concerns about whether or not the tree would be sturdy enough to hold up my purse and/or Lee's jackets but it doesn't seem to be an issue at all!
Best $4 spent . . . EVA!
I hope you like it as much as we do!!! Anyone else transformed an ugly duckling into a swan using ORB Spray Paint?
I'm not sure if I've ever squeaked out so much joy from $4? On a recent trip to our local secondhand store (Salvation Army) I found a very wobble-y, very gold coat tree. We've been looking for a coat tree since we moved in a year and a half ago but it wasn't a necessity so it always got pushed down the list. Luckily it did or we would have spent way more then $4.
Here's what the big gold beast looked like before:
and this is how he looks now . . . can you say tall, dark and handsome!?
Is there anything that a can of oil rubbed bronze spray paint can't fix?? (side note: the coat hook behind the tree will get moved)
Now for $4 he wasn't without his issues. Besides the gold finish, it was missing one pipe topper and one screw. Lee was able to fix the screw by putting in one of our own, but the small ball is missing for good, we just turned that side towards the wall! ;) Fixed!
I think my favorite parts now, were my least favorite parts before we sprayed it. The Plastic Topper and Plastic fastener piece (it holds the two sections of pole together). They are made of super cheap plastic and when they were still gold it was really obvious, but in oil rubbed bronze they look fantastic!!!
I'm so glad that it all worked out, like I said we've been hoping to get a coat tree for that spot for a while now. We both had some serious concerns about whether or not the tree would be sturdy enough to hold up my purse and/or Lee's jackets but it doesn't seem to be an issue at all!
Best $4 spent . . . EVA!
I hope you like it as much as we do!!! Anyone else transformed an ugly duckling into a swan using ORB Spray Paint?
Thursday, May 17, 2012
Turn that Frown Upside Down
Just a quickie change-up in our downstairs hallway.
We had what can only be described as the half boob sconce. It was . . . let's just say, not our "style".
Before:
I was desperate to find a replacement. I went to Lowes and saw what I thought would be the perfect fixture. It had the whole oil rubbed bronze thing going on. And the linen shade was C-ute!
Turns out there wasn't a enough room between the lamp shade and the sloped ceiling. So it looked like I might have to take it back . . . but then I "Turned that Frown, Upside Down" hehe. I flipped the sconce, so that the shade was down.
Success!!! I think I might try to add a little diffuser to the bottom so you can't see the tiny bit of white on the inside. But we'll try that later!
For now I'm sporting my upside down frown (a big smile) over getting rid of the 'half boob' light!
btw, I'm busy working on a how to make a Fake Roman Blind post for next week. And working on a "Things I'm afraid to tell you" post for tomorrow. I hope you'll pop back and check 'em out!!
We had what can only be described as the half boob sconce. It was . . . let's just say, not our "style".
Before:
Success!!! I think I might try to add a little diffuser to the bottom so you can't see the tiny bit of white on the inside. But we'll try that later!
Tuesday, April 10, 2012
Our Newest Family Member: Goldie Hawn
In almost every home we've had together, we've had a fish tank. Maybe it's because Lee is an Aquarius and has a natural affinity to water, or maybe it's because fish are good feng shui, or maybe it's because in another life I was a mermaid!
The reason that we've waited so long to put one in here is because . . . Generally fish tanks are UGLY! There I said it!
We were at Petsmart buying birdseed for Carson, and there it was . . . a pretty fish tank. And double bonus it's also a fountain! The water bubbles out over the top and lands back into the tank. It's like the perfect feng shui tank . . . then I read the box and it's called the CHI tank it was built with feng shui principles in mind! (Tank on the right is the picture off of the box, the Tank on the left is how it looks on our console table).
There are no visible wires and obvious filters. The small square at the top holds the filter and the lights. The water gets sucked up through the bottom of the square then spilled gently over the top and back into the tank.
I also loved that there are all different accessories for it (this girl LOVES her some accessories ;).
So for around $60 we brought it home.
We chose the front hall console because:
-We can see the tank from the Library (soon to be Office) and watching fish swim is a proven de-stresser and Anxiety reducer (something welcomed and needed in an office).
&
-It's on the East side of our house which, according to feng shui, should bring energy, ambition, health and family luck.
We filled it with water and let it cycle (run) for about a week to make sure everything is balanced and good and then we added two fish! Why is there only one fish in the tank now, you ask????
Well clearly it's because the other goldfish jumped out and Max ate it!! Seriously, I'm not joking! We filled the tank a bit too full and the fish jumped out landed on the carpet, and before we could get to it, Max ate it!
I debated telling you guys about this, I felt really bad for the fish, and I don't want to upset anybody about his terrible demise, but we share almost everything on Mini Manor, the good, the bad and now the truly disgusting!
We now keep the water level lower and Goldie Hawn hasn't jumped out so we feel comfortable adding another one sometime soon.
Here's how it looks on the console:
And for those of you wanting to see another angle of the carpet, here's one looking at the the front door:
I hope you like our new fish tank as much as we do. I think My favorite part is the trickling noise it makes as the water bubbles out of the top, and over the rocks.
Welcome Home Goldie Hawn!!! (Sorry about your buddy).
The reason that we've waited so long to put one in here is because . . . Generally fish tanks are UGLY! There I said it!
We were at Petsmart buying birdseed for Carson, and there it was . . . a pretty fish tank. And double bonus it's also a fountain! The water bubbles out over the top and lands back into the tank. It's like the perfect feng shui tank . . . then I read the box and it's called the CHI tank it was built with feng shui principles in mind! (Tank on the right is the picture off of the box, the Tank on the left is how it looks on our console table).
There are no visible wires and obvious filters. The small square at the top holds the filter and the lights. The water gets sucked up through the bottom of the square then spilled gently over the top and back into the tank.
I also loved that there are all different accessories for it (this girl LOVES her some accessories ;).
So for around $60 we brought it home.
We chose the front hall console because:
-We can see the tank from the Library (soon to be Office) and watching fish swim is a proven de-stresser and Anxiety reducer (something welcomed and needed in an office).
&
-It's on the East side of our house which, according to feng shui, should bring energy, ambition, health and family luck.
We filled it with water and let it cycle (run) for about a week to make sure everything is balanced and good and then we added two fish! Why is there only one fish in the tank now, you ask????
Well clearly it's because the other goldfish jumped out and Max ate it!! Seriously, I'm not joking! We filled the tank a bit too full and the fish jumped out landed on the carpet, and before we could get to it, Max ate it!
I debated telling you guys about this, I felt really bad for the fish, and I don't want to upset anybody about his terrible demise, but we share almost everything on Mini Manor, the good, the bad and now the truly disgusting!
We now keep the water level lower and Goldie Hawn hasn't jumped out so we feel comfortable adding another one sometime soon.
Here's how it looks on the console:
And for those of you wanting to see another angle of the carpet, here's one looking at the the front door:
I hope you like our new fish tank as much as we do. I think My favorite part is the trickling noise it makes as the water bubbles out of the top, and over the rocks.
Welcome Home Goldie Hawn!!! (Sorry about your buddy).
Tuesday, April 3, 2012
Front Hall Carpet
We picked up a new carpet for our front hall! Well, kind of!
It is new, but you've seen it before. It's the exact same rug as our library rug. I love that rug, and the price is "just right". Now
because the library rug and the new front hall rug are mere inches away from each other they had to play nice, more then that they had to be BFF's.
So what's closer, then twins!!!
In case you're not seeing where I'm going . . . I bought the exact same rug from the library, for the front hall. If you didn't catch it the first time we revealed this carpet, it's a Debbie Travis Rug from Canadian Tire. LOVE the pattern and the simple neutral palette!
I hope you like it! It's a WAY better fit then our old tiny one!
It is new, but you've seen it before. It's the exact same rug as our library rug. I love that rug, and the price is "just right". Now
because the library rug and the new front hall rug are mere inches away from each other they had to play nice, more then that they had to be BFF's.
So what's closer, then twins!!!
In case you're not seeing where I'm going . . . I bought the exact same rug from the library, for the front hall. If you didn't catch it the first time we revealed this carpet, it's a Debbie Travis Rug from Canadian Tire. LOVE the pattern and the simple neutral palette!
I hope you like it! It's a WAY better fit then our old tiny one!
Thursday, March 22, 2012
New Entry Art
I mentioned in this post, that we were starting to decorate with a more neutral direction in mind. Part of the reason we're going more neutral is because I love homes where there is crazy, bold artwork and I think that a nice neutral backdrop is the perfect accent to it.
I wouldn't really say that we have any specific taste in artwork, we just kind of like what we like. No reason, I don't even think I could explain it if I tried. Sometimes we just see something and love it, which is also why a neutral scheme in the house works really well for us.
Now, here's where I'm going with all of this, we found a new piece of art for our front entrance. We saw it . . . loved it . . . had to have it. I think it kind of reminded me of Lee and myself, only a little taller, and a little slimmer ;).
We found it at Homesense complete with wood frame around the canvas, but I've seen the Canvas on sale at Target, you can see it here.
We hung it in the front hall above the console. It's one of the first things that you see when you walk in the front door, and the last thing you see as you leave.
We're super happy with it, and it also means that we're making progress on the front entrance.
Still to come:
I hope you like it too! And Yes, I know the peace lily plant has kind of gotten out of control. Lee saw this picture and said he didn't realize how big that plant has grown.
Actually add that to the list:
I wouldn't really say that we have any specific taste in artwork, we just kind of like what we like. No reason, I don't even think I could explain it if I tried. Sometimes we just see something and love it, which is also why a neutral scheme in the house works really well for us.
Now, here's where I'm going with all of this, we found a new piece of art for our front entrance. We saw it . . . loved it . . . had to have it. I think it kind of reminded me of Lee and myself, only a little taller, and a little slimmer ;).
We found it at Homesense complete with wood frame around the canvas, but I've seen the Canvas on sale at Target, you can see it here.
We hung it in the front hall above the console. It's one of the first things that you see when you walk in the front door, and the last thing you see as you leave.
We're super happy with it, and it also means that we're making progress on the front entrance.
Still to come:
- We still need an Area Rug
- and I'm thinking it might be the perfect spot for a small fish tank (goldfish are great feng shui).
I hope you like it too! And Yes, I know the peace lily plant has kind of gotten out of control. Lee saw this picture and said he didn't realize how big that plant has grown.
Actually add that to the list:
- Move peace lily to new spot in house and pick out a better proportioned plant for that spot!
Monday, March 19, 2012
A little privacy Please!
So I'm just going to come right out and say it . . . "I'm pretty sure half of the neighborhood has seen my butt" ~ Lee February 2012 ;) hehe
Here's the spec's:
~At the top of our stairs there is a BIG window.
~It's west facing and we're lucky not to have a house on that side.
~We can use all of the natural light we can get.
~The view was Less than desirable
So we needed something that wouldn't block the light, but would give us privacy (so that the other half of the neighborhood doesn't see Lee's butt!).
Vinyl Window Film was the perfect solution.
You can buy it on Amazon, or Walmart has it sometimes, we bought ours from Canadian Tire. It's part of their Debbie Travis Line.
It cost around $20 and we were able to cover the whole window.
It was really easy to install, first, wash you window. Next spray window with water. Cut Vinyl to size and place on top of wet window. Squegee out the bubbles! DONE! Seriously so easy!
Here's how it looks at Night, we chose a Bamboo Pattern:
Sorry I had to take the photo at night otherwise you wouldn't be able to see the pattern, here's how the window looks during the day:
We're really happy with it. It blocks NONE of the light and gives us complete privacy, definitely a great alternative to blinds!
Here's the spec's:
~At the top of our stairs there is a BIG window.
~It's west facing and we're lucky not to have a house on that side.
~We can use all of the natural light we can get.
~The view was Less than desirable
So we needed something that wouldn't block the light, but would give us privacy (so that the other half of the neighborhood doesn't see Lee's butt!).
Vinyl Window Film was the perfect solution.
You can buy it on Amazon, or Walmart has it sometimes, we bought ours from Canadian Tire. It's part of their Debbie Travis Line.
It cost around $20 and we were able to cover the whole window.
It was really easy to install, first, wash you window. Next spray window with water. Cut Vinyl to size and place on top of wet window. Squegee out the bubbles! DONE! Seriously so easy!
Here's how it looks at Night, we chose a Bamboo Pattern:
Sorry I had to take the photo at night otherwise you wouldn't be able to see the pattern, here's how the window looks during the day:
We're really happy with it. It blocks NONE of the light and gives us complete privacy, definitely a great alternative to blinds!
Wednesday, December 7, 2011
Staircase Artwork: tweet tweet
You might have caught a glimpse of our new staircase artwork yesterday.
I was shopping for powder room artwork at Michaels when I stumbled on to these little birdie prints. I fell in LOVE but I had no idea where to put them, so I may, or may not have, hidden them behind some posters of Justin Beiber for a couple days until I could think of the perfect place for them.
Honestly two days later I still couldn't think of the perfect place to put them, but I did have a 40% off coupon so I took a leap of faith, knowing that something I loved that much would find a perfect spot in our home! They Did!!!
I LOVE the spot at the top of the steps.
Here's how the staircase looked before we moved in:
and After:
I was shopping for powder room artwork at Michaels when I stumbled on to these little birdie prints. I fell in LOVE but I had no idea where to put them, so I may, or may not have, hidden them behind some posters of Justin Beiber for a couple days until I could think of the perfect place for them.
Honestly two days later I still couldn't think of the perfect place to put them, but I did have a 40% off coupon so I took a leap of faith, knowing that something I loved that much would find a perfect spot in our home! They Did!!!
I LOVE the spot at the top of the steps.
Here's how the staircase looked before we moved in:
and After:
We painted the panels at the top of the stairs in the same trim color as the rest of the house (Martha Stewart's Heavy Cream), but I think that it's the bird prints that keeps me coming back for more.
Total Cost:
Pictures $30 for the set . . . - 40% = $18
Set of two black frames $10 . . .- 40% = $6
__________________________________
Total Cost = $24 I love Michaels Coupons . . . and birdy prints!
Anyone else hidden anything in a store? . . . come on . . . you can tell me ;)
Thursday, November 10, 2011
Small Space Lighting
I think because we use to live is such cramped quarters I'm happiest when dealing with the small little cubbies in our house. They small little nooks around are house are some of my favorite spaces.
Like this little nook off the front entrance. It holds the coat closet, and the powder room is off of it.
We've had this light fixture since our very first apartment right after we got married. I found this little chandelier at BOWRING on super clearance for $25. I had no where to put it so we kept it in a rubbermaid tote for a year. Then we moved into the Townhouse and tried it out in the dining room but it was too small, we tried it over the bed, it was WAY to small.
When we moved into this house, I immediately knew where it would hang. It had perfect proportions for the little nook. HE was really easy to install, there was already a pot light there, so we just swapped out the pot light for the mini chandelier!
I love little touches in unexpected places!!! MY FAVORITE!
Like this little nook off the front entrance. It holds the coat closet, and the powder room is off of it.
We've had this light fixture since our very first apartment right after we got married. I found this little chandelier at BOWRING on super clearance for $25. I had no where to put it so we kept it in a rubbermaid tote for a year. Then we moved into the Townhouse and tried it out in the dining room but it was too small, we tried it over the bed, it was WAY to small.
When we moved into this house, I immediately knew where it would hang. It had perfect proportions for the little nook. HE was really easy to install, there was already a pot light there, so we just swapped out the pot light for the mini chandelier!
I love little touches in unexpected places!!! MY FAVORITE!
Wednesday, October 19, 2011
Halloween: Indoor Edition
Halloween around this Manor is a two part affair, indoors and outdoors. Since this is the first year we have both an inside and an outside to decorate we're a little bit overwhelmed! I've taken over inside decorating tasks and Lee is the boss outside.
Lee's still working on his outside decorating so you'll have to wait until next week to see that (apparently there aren't enough disemboweled bodies out there yet ;).
I decided to keep the Halloween decor to the library and front hall, I've been in a bit of a minimalist mood lately so I wanted to keep the clutter to a minimum in the living room and kitchen.
In the library I added skulls, skulls and more skulls :)
We bought an angry black cat years ago! (Max hates the black cat poor little guy won't go into the library anymore . . . the angry black cat might have to head outside).
A crow and a huge chrome skull found their place on the coffee table. Along with some black bound books, I picked those books because they're black not because they're particularly scary . . . unless you consider Martha Stewart scary then one of them is scary. hehe
I bought a package of small mice from Walmart for $2.00 and that's the only money I spent on the library decorations.
For the Front Door Console I added the table runner from our thanksgiving table, it's a little less spooky then I was hoping to go, but I liked the little hint of orange it gave. I added a couple of candles and wrapped them in black patterned scrapbook paper. We still needed a lamp there and since our white ceramic lamp wasn't very Halloween-y I added a burlap ribbon and some tiny little skeletons. And I thought the bloody hand prints added a murderous feel haha.
I put out our candy cube, just a box for Candy that I picked up at Homesense a couple of years ago, I like that it has a lid on it, it makes it just that much harder for us to grab candy out of (heaven knows if it was an open bowl of candy there wouldn't be anything left come Oct.31st).
A couple of black books I found at the Dollar Tree, labeled THE DARK SACRAMENT oooooooo . . . spooky!
And of course skulls, skulls and more skulls. I LOVE putting them under glass, I think there's something very classy about a skull under glass . . . kind of like a specimen.
Total Cost for Console:
$1 for Mice
$1 for two sheets of scrapbook paper
$4 for bloody hand prints
+
$1 for library mice
___________________________
$7 spent on indoor decor, we had everything else we needed (thanks to Lee and his creepy love of skulls).
We must have done a good job because I peeked in at the library and found this guy, relax'in reading a book!! haha
Lee's still working on his outside decorating so you'll have to wait until next week to see that (apparently there aren't enough disemboweled bodies out there yet ;).
I decided to keep the Halloween decor to the library and front hall, I've been in a bit of a minimalist mood lately so I wanted to keep the clutter to a minimum in the living room and kitchen.
In the library I added skulls, skulls and more skulls :)
We bought an angry black cat years ago! (Max hates the black cat poor little guy won't go into the library anymore . . . the angry black cat might have to head outside).
A crow and a huge chrome skull found their place on the coffee table. Along with some black bound books, I picked those books because they're black not because they're particularly scary . . . unless you consider Martha Stewart scary then one of them is scary. hehe
I bought a package of small mice from Walmart for $2.00 and that's the only money I spent on the library decorations.
For the Front Door Console I added the table runner from our thanksgiving table, it's a little less spooky then I was hoping to go, but I liked the little hint of orange it gave. I added a couple of candles and wrapped them in black patterned scrapbook paper. We still needed a lamp there and since our white ceramic lamp wasn't very Halloween-y I added a burlap ribbon and some tiny little skeletons. And I thought the bloody hand prints added a murderous feel haha.
I put out our candy cube, just a box for Candy that I picked up at Homesense a couple of years ago, I like that it has a lid on it, it makes it just that much harder for us to grab candy out of (heaven knows if it was an open bowl of candy there wouldn't be anything left come Oct.31st).
A couple of black books I found at the Dollar Tree, labeled THE DARK SACRAMENT oooooooo . . . spooky!
And of course skulls, skulls and more skulls. I LOVE putting them under glass, I think there's something very classy about a skull under glass . . . kind of like a specimen.
Total Cost for Console:
$1 for Mice
$1 for two sheets of scrapbook paper
$4 for bloody hand prints
+
$1 for library mice
___________________________
$7 spent on indoor decor, we had everything else we needed (thanks to Lee and his creepy love of skulls).
We must have done a good job because I peeked in at the library and found this guy, relax'in reading a book!! haha
Subscribe to:
Posts (Atom)