skip to main | skip to sidebar

Mini Manor Blog

    Showing posts with label Master Bedroom. Show all posts
    Showing posts with label Master Bedroom. Show all posts

    Thursday, March 20, 2014

    4 Steps to an Organic Bed

    I am not sure I have ever valued sleep more in my life than I do right now. . . a 9 month old baby can make that happen. I have spent more than 1 early morning laying in bed, staring at the video monitor praying for those wiggly arms and legs to calm down and fall back asleep. And I'm not going to lie . . . I have bartered with god at some very un-godly hour for just 10 more minutes of sleep. There was also one very desperate morning when I offered Lee $100 to get the baby . . . I think he could sense my desperation because he didn't even point out that we are a single income family so, me giving him $100 was essentially, him giving himself $100. ;)

    We decided that investing in our sleep at this point in our life would be a very good idea. I searched for organic bedding, mattress pads and pillows. Creating a completely organic bed has been on my wish list for a few years now, and while we haven't taken the plunge with an organic latex mattress, we did take the plunge on an organic latex mattress pad and organic latex pillows
    I started with an organic latex mattress topper, after sleeping on it for 4+ months I can honestly say it was so worth the investment. We were planning on eventually investing in an organic latex mattress, but the mattress pad is working out so well for us we've put any plans for a new mattress on hold.

    Here's our Organic 100% natural Latex Mattress Topper details:
    -It's from Sleeponlatex.com We were really happy with their customer service, they helped us pick out the right firmness for us and shipping was fast.
    -No Fillers or synthetic latex, only natural latex.
    -It is OKEO standard certified to be free of any harmful chemicals and is certified to only contain latex from organically grown rubber trees.
    Lee mentioned that he felt cooler at night, so I looked it up and because these toppers have holes in the latex foam it actually keeps you cooler. That was enough for Lee to hear and ordered up the pillows as well, because nothing is as satisfying as the cool side of the pillow. They are made from the same Natural Latex as the mattress topper, except in a rounder shape (if that makes sense), and they are kind of like sleeping on a cloud! Honestly if you don't need a new mattress topper or it's not in your budget right now, a couple of these pillows will rock your world. They also have different pillows for side sleepers and for back sleepers. I am a side sleeper, and Lee is a back snorer . . . errr I mean sleeper, so we each got our own pillow fit perfectly for us.
    So after the mattress topper and pillows were ordered we had the healthy foundation set, on to the fluff . . . organic fluff that is. We chose organic sheets from Target . . . seriously organic sheets for around $50 I am in!
    We used the same organic cotton, woven blanket also from Target. And because I need something a little warmer (we live in Canada), we picked up the organic pin tucked duvet cover from West Elm.
    And that's all there is. It was a bit of an investment but seriously, sleep is at a premium these days so it was money well spent. We are very happy with our sleeping situation. One thing we weren't expecting but some of Lee's back pain went away. He has always had a bit of back pain (nothing serious) but it's mostly gone now. :) I have recently had some back pain start up but I blame that on our 26 lb 9 month old not our bed. ;)

    In conclusion, my 4 Steps to an organic bed are:
    1. An Organic Latex Mattress or and Organic Latex Mattress Topper 
    2. Organic Latex Pillows
    3. Organic Sheets
    4. Organic Duvet Cover
    *I received a few questions on the second photo, yes that is a zippered mattress pad cover. They are made from 100% Bamboo and are completely washable. I would definitely recommend the covers from Sleep on Latex as well. Then you can just wash away the dust bunnies or dead skin (gross I know but somebody had to say it).
    Posted by Maillardville Manor at 3:30 AM 9 comments
    Email ThisBlogThis!Share to XShare to FacebookShare to Pinterest
    Labels: Green, Master Bedroom

    Thursday, April 4, 2013

    Simplified Walk In Closet

    I don't know why, but I am in the mood to simplify. I was so tired of having a closet full of shoes and clothes and still having nothing to wear. So I tried on every piece in my closet . . . every single piece. It took the entire afternoon, thank goodness for my sister and her insanely brutal opinions. Lee is good at many things but telling me I don't look good in something isn't one of them, my sister on the other hand should consider it a career because she is very good at it!! ;)

    I was able to purge 35 pairs of shoes, 5 skirts, 7 pairs of pants, 14 shirts, 3 purses, some belts, some shorts, some tank tops and other random bits and pieces.

    Because I was able to donate so much stuff (including 1 skirt that friends and family kindly refer to as "The Belt" because it's closer to the size of a belt than the size of a skirt) I had way more room in my closet.
    I was able to re-organize it so that everything fit easily in our Custom Closet Design. There's room for shoes, and long dresses now!!
    p.s. taking photos in a closet with NO natural light is not easy

    The left side of the closet holds shoes (a collection that is down 35 pairs), and my slightly fancy tops.
    The right side holds my pants and skirts on the bottom, and my sweaters on the top!
    The middle holds two green bins at the top, they contain my purses, and my tall boots. The two drawers hold my t-shirts and unmentionables! ;o

    Lastly the two bins at the bottom hold my gym stuff, I have an ankle brace and a knee brace, as well as gym shoes and an assortment of yoga pants, shorts, tops and sports bras . . . some of which I need more than others (I'm talking about you sports bra ;).

    I think the key to personal storage is just creating zones. For example when I'm changing for the gym I have one area where all my gym stuff is located. When I'm getting dressed in the morning all of my clothes are on the right side of the closet. If I'm headed out somewhere fancy, which these days can mean Target (oh I am so glamorous) I know that all my fancy clothes are hanging on the left side of the closet.
    And a chandelier doesn't hurt either!! ;)

    While I love the idea of simplifying my closet and thereby simplifying my wardrobe . . . I do still realize this is A LOT of clothing. I am definitely NOT a minimalist! My idea of simplifying is pairing something down so it works for you (me). I know some people might love that they only have 30 things in their closet, but for me only having 30 options would stress me out, and getting stressed isn't what simplifying is trying to accomplish. Maybe one day I'll get to that point but for right now 30 pairs of shoes is my idea of simple. To me a place for everything and everything in it's place is simplified perfection!

    Make sure to pop back later today to find out the winner of our Charles Emerson Giveaway! As well as a 20% off coupon code for ALL of our readers!!!!
    Posted by Maillardville Manor at 4:00 AM 24 comments
    Email ThisBlogThis!Share to XShare to FacebookShare to Pinterest
    Labels: Master Bedroom, Organize: Bedroom

    Monday, October 1, 2012

    A bedroom fit for Fall

     We might be on Flannel overload! My favorite season is Fall. The cooler weather, the crisp air . . . the pumpkin spice lattes :). I especially love fall colors and textures. Adding all the layering and cozy fabrics is my idea of "home".

    I started in the bedroom! I love flannel! It might not be the most luxurious of fabrics but I love it!
    We've always switched over to flannel sheets for the fall or winter months, but we've never had a bed FULL of flannel before. By full of flannel I mean, sheets, pillow cases, duvet cover, euro shams the whole she-bang.

    This idea was easier said than done. Finding a reasonably priced flannel duvet cover was next to impossible. I didn't say a flannel duvet cover . . . I said a reasonably priced flannel duvet cover! And just to be clear I don't consider anything over $150 in flannel to be reasonable! :)

    I ended up finding $25 flannel sheets at target (that's $25 for any size, so with our king sized bed I felt like I was getting an extra good deal). They were a little more . . . let's say "MANLY" then I thought I would like.
    But somehow the Big Bold Plaid appealed to the Fall Lover in myself . . . and you know Lee loves it! So we went with PLAID!
    Since target didn't sell it in a duvet cover I had an idea. What is a duvet cover but two flat sheets sewn together? So I picked up two sets of sheets, at $25 each that would total $50 for a flannel duvet cover, 4 pillow cases, a spare fitted sheet and enough fabric to make 3 euro shams! All for $50! And seriously, if you can sew a moderately straight line, you can make a duvet cover!
     And an envelope slip cover for your chair ;).
    I'm not going to lie . . . it is seriously cozy up in here!! ;) 
    Posted by Maillardville Manor at 4:00 AM 32 comments
    Email ThisBlogThis!Share to XShare to FacebookShare to Pinterest
    Labels: Master Bedroom, Seasonal: Fall

    Wednesday, June 27, 2012

    This little light of mine . . .

    I'm gonna let it shine . . . while I read . . . in bed.
    I saw this light at Target last week (I can't find the link to Target but you can find it here also) and I couldn't resist! It was the definition of an impulse purchase, I saw it, I loved it, I had to have it!
    I've mentioned before how I love to read in bed and if I didn't already, this light would make me love it now!
    The flower also comes in PINK, White and Green, but I thought Yellow would match the green in the pillows, without being too matchy matchy.  I especially loved that it simply clipped on so we didn't have to drill any holes in the wall.
    And thankfully the cord tucks neatly behind the bed post!
     Let it shine, Let it Shine, Let it Shine!!! ;)
    Posted by Maillardville Manor at 4:00 AM 23 comments
    Email ThisBlogThis!Share to XShare to FacebookShare to Pinterest
    Labels: Master Bedroom

    Wednesday, June 20, 2012

    Green, Green and more Green

    It seems we've done a complete bed overhaul. It started with our new duvet and duvet cover, we added our organic cotton sheets from Target, next came our natural latex mattress topper and now our new green pillows.
     We're BED people (see definition below):
    Bed People: The type of people who like to hang out in bed watching movies, reading books and surfing the Internet. 

    It's true we do like to hang out in bed, I blame best selling novels and netflix!

    With our newly remodeled bed we've been spending even more time snuggled in. I chose to make three pillows for the back of the bed because leaning up against a metal bed frame isn't the most comfortable thing in the world, I'd imagine it was something similar to leaning up against Kate Moss. ;)
    I'm so happy with the way that our new pillows turned out. I love that the color green is the exact color found in our duvet.
    I love the way that the feather pillow inserts fluff up!

    I especially love the contrast of the white piping around the pillows against the green. Although I didn't love sewing the piping on (tutorial to come).
    There was also a happy accident that happened on the back. Using my trusty Envelope Pillow cover technique, I started cutting the fabric for the pillows. I accidentally (aka. Terrible Measuring and Mathematical skills) cut one of the back pieces way to small. I remedied this by sewing on a piece of white fabric to make the back piece longer. The little pop of white on the back is one of my favorite parts of the pillows!

    I hope you love 'em as much as we do!
    I'm working on a how to post for next week. Sewing the piping on the first pillow was a bit difficult due to my lack of sewing skills. But the second pillow was easier and by the time I made it to the third pillow I had worked all the kinks out and was able to whip it up in 5 minutes flat! I'll share my tips and tricks with you in the how to post!
    Lots of Love !
    Posted by Maillardville Manor at 4:25 AM 21 comments
    Email ThisBlogThis!Share to XShare to FacebookShare to Pinterest
    Labels: Master Bedroom

    Thursday, May 31, 2012

    Dill Weed on my bed!

    Yup, You read that right . . . I just titled a post "Dill Weed on my Bed", I should just retire from blogging right now! Hopefully the title caught your attention, in a "gee, I wonder what that's about" way and not in a "I'm going to stop following this chick . . . she's weird" way.
    I'm just going to move on and start explaining before "I'm going to stop following this chick . . . she's crazy" seems like a great idea.
    We picked up a new duvet and duvet cover. There are a couple of reasons why:
    1) We use to have a comforter that didn't have a removable cover and because Max frequently sleeps in the bed I wanted something that was easier to wash regularly.
    2) Every time I did go to wash it, I would have to take it to the laundry mat because it wouldn't fit into our washing machine. As much as I love creepy men throwing their laundry into the washing machine with my laundry (seriously that happened to me once when we were renting). I hate taking that time out of my day to trek up to the laundry mat (however, I do enjoy the outdated trashy magazines).

    Our bestest friends just picked up a kind size bed and needed all new linens. They were saying that they couldn't find anything they really liked and didn't want to fork out a ton of cash for something they didn't like but had to buy.  I offered them our comforter and after a ton of dirty jokes about what was done on it/under it (we're classy like that), they took it home. I was really happy that they were able to use it, because we only used it in the winter and it was only a year old. Most secondhand stores won't take bed linens so needless to say . . . I was thrilled it wasn't ending up in the dumpster!

    Now, on to our new duvet and duvet cover, ta-da:
    We picked up the duvet cover from a Swedish store here in Canada called JYSK. The duvet cover with two matching shams cost $45.99. It took me forever to source a duvet cover, that didn't break the bank and wasn't made of synthetic materials. I believe that our beds should be as natural as possible! This set was made of 100% cotton!
    I also love the Dill Weed pattern.
    p.s. I made that quilt!! :)

    But perhaps the clincher was the green dots. Join me for a trip down memory lane, remember when the living room had green and blue accents well now that it's Switzerland (all neutral), I had a few green and blue accents leftover. I was able to move the lamps into the guest room, and I'm hoping to move the rest of the green into the bedroom. 

    Also in the works I'm planning to make three Euro Shams (Square pillow cases) for behind the pillows, mostly because I know how much Lee 'LOVES' throw pillows on the bed. haha NOT.
    I found a green polka dot fabric, that has exactly the same shade of green as the duvet, so hopefully next week I'll get working on those!

    And lastly I should take about our duvet. We went with a feather duvet. I grew up with feather duvets and I loved them. I do have some mild feather allergies, but I've always found that as long as a duvet is Hypoallergenic I'm A OK. We found our feather duvet on Overstock.com. It was a great price at just under $100 for a KING. And most importantly, it's made with an all natural chemical free 100% cotton shell.
    I hope you like our Dilly Bed as much as we do! I'm working on a post about the elements of a clean, green Bed. And we just ordered our organic Latex Mattress topper!!! So excited!!! It should arrive next week!
    Posted by Maillardville Manor at 4:00 AM 35 comments
    Email ThisBlogThis!Share to XShare to FacebookShare to Pinterest
    Labels: Green, Master Bedroom

    Monday, May 7, 2012

    Master Bedroom Fireplace!!!!

    Some Like it HOT!!!!
    This is hands down my Favorite Project EVER!!! BUT . . . there were some serious moments of question. When the frame went up I thought that the fireplace insert was way too BIG. Then when the boards went up on the frame I thought the whole thing was WAY too big. Then I thought maybe it was too rustic. Lee finally just said "I'll finish it and if you don't like it we can change it but lets see this through first" who knew Lee had more faith in my vision then I did?
    I'm so glad I listened to him because I am in love with our new bedroom fireplace. He did an amazing job!
    AAAAhhhhhh! So cute!!
    It feels so cool to add a dream house element to our master bedroom. A fireplace has always been something I wanted in the bedroom. I'm so excited to knock it off of my Household "Bucket List".
    It's also really useful, because our master bedroom has 3 exterior walls, making it a bit colder then the rest of the house, our new fireplace should help keep us nice and toasty this winter.
    Here's how it looks with out the art:
     and with the art:
    The picture we had hanging around from before we were married. An art store near our first apartment was having a going out of business sale and I picked up this framed print for $10!! I was 19 and it was my first piece of artwork that didn't get ripped out of a magazine. We used it in our first apartment, I don't think we used it in our townhouse (if I remember correctly it lived in our storage locker in the basement). We decided that if we couldn't find a spot for it in this house it had to go. I've been searching for a place to hang it . . . I think above the fireplace is PERFECT!
    The chair in the corner adds some serious softening to all of the hard lines of the fireplace! I always thought that the chair was too big for our bedroom, but now it looks like it's the right scale . . . I think anything less would have seemed teeny tiny! I love it when a plan comes together and other issues like under scaled chairs fall in line! ;)
    I'm thrilled with how it all came together.

    Now for COST . . . we went over budget. I was being, some might say "overly optimistic" when I declared our first budget of $150 (have you seen how much wood costs ? ? !! haha).

    Here's our Budget Breakdown:
    Electric Fireplace insert - $40 off Craigslist. It had a broken fan, Lee fixed it, saving us over $100.
    Framing 2x4's  -  $ 35
    Facing boards 1x6's  - $72
    Corner Trim - $12
    Bottom Baseboard trim 7 1/2" tall - $8
    Quarter Round trim around baseboard - $5
    Trim around Top 3" baseboard - $2.60
    Trim along wall - $7.80
    Kilz No VOC primer- Free
    After we primed the boards we only needed a tester pot of paint! At $4 we bought Martha Stewart's HEAVY CREAM, it was a really close match to the Ikea wardrobe beside it! It was a HUGE bonus that we only had to buy a tester pot!
    Misc Nails and Screw  $5
    _______________________________________________________________________
    Total Cost:  $191.40
    We came in $41.40 over budget . . . But this is our new view from bed:
    Definitely worth the extra $41.40!!!
    One last look :)
     I hope you like it as much as we do!

    Lee's working on a great HOW TO for later this week! It will have all the nitty gritty details, step by step!! 
    Posted by Maillardville Manor at 4:00 AM 58 comments
    Email ThisBlogThis!Share to XShare to FacebookShare to Pinterest
    Labels: Master Bedroom, Projects

    Friday, May 4, 2012

    Fireplace Update

    The main structure is up, but it hasn't been trimmed out yet. Be kind . . . it's still a work in progress!
     We wanted something a bit rustic, but not too rustic and it had to be BIG to stand up to the wardrobe beside it.
    We decided on 1" by 6" Wood boards, They were inexpensive, and smooth, but just rough enough to give a little rustic feel. We're painting them the same color as the wardrobe beside it, a fresh warm white. So rustic but not too rustic.
    I briefly considered using chipped an peeling barn board. But One it would have been too rustic and two, you never have any idea what kind of paint they used.

    On Monday I declared that we would try and keep it in the $150 range. We just blew past it and are sitting at $160 with about $20 more material to buy, so hopefully we'll keep it under the $200 mark.
    One question that kept popping up was "How can you install a fireplace for $150, when the unit would cost at least that?" Our answer is always "CRAIGSLIST" we found this unit for $40!!!! It's a very expensive electric unit with an insanely realistic flame (it's actually looks as real as our gas fireplace in our living room). It was originally in a house as a corner unit, but because we had so much depth beside our wardrobe we could use it as a regular unit, and the reason it was $40 was because the fan was broken, so it heated up but didn't get blown around. It took Lee less then 30 minutes to fix and we were in business . . . Hot Business!

    We added a small trim detail at the bottom, it was one of those things. We needed to hide a small gap between the fireplace and the boards, but didn't want to go to the trouble of cutting down a large board, so we found this 1" by 1" trim and it fit perfectly, popping out just the right amount.

    We still have to add trim, (which I can't wait for, Lee mocked it up yesterday and it made a HUGE difference):
     Prime the wood, we're using Kilz "Extremely Low VOC" Primer! We couldn't have come across this product at a better time. Because we're priming and painting in the bedroom, I wanted to make sure there were no VOC's or Terrible odors! Who wants to breathe that in all night. Honestly Kilz primer had very little smell, and it only took one coat to seal the wood!
    Paint, we hoping to match the wardrobe color exactly.
    And lastly remove the two brass handles on the screen. They are strictly decorative, and definitely unnecessary in all their shinny brass-ness (that's a word!). 

    We'll be trimming and painting all weekend and HOPEFULLY we'll have a reveal post and a How to post ready for MONDAY!!!

    Posted by Maillardville Manor at 4:00 AM 19 comments
    Email ThisBlogThis!Share to XShare to FacebookShare to Pinterest
    Labels: Master Bedroom

    Tuesday, May 1, 2012

    Big Master Bedroom Project

    I am so excited,
    Yesterday we started on a Big project in the Master Bedroom!
    • It's something I've always wanted in the bedroom.
    • It was part of my "Dream House" List. 
    • It's oh so romantic
    • It will keep us Toasty Warm! 
    If your still not sure what I'm talking about . . . we're putting in a fireplace!!!
    Framing went up yesterday, fireplace is going in today!  We're keeping it on a SUPER tight budget, I'm hoping it will come in under $150 TOTAL! As always, I'll let you know how it goes!!!
    Posted by Maillardville Manor at 4:00 AM 16 comments
    Email ThisBlogThis!Share to XShare to FacebookShare to Pinterest
    Labels: Master Bedroom, Projects

    Wednesday, March 7, 2012

    Master Bathroom

    I am CRAZY about trays as you can see from our Boot Tray post, our powder room tray, and the tray beside the stove. I think that a beautiful white porcelain tray not only looks fabulous, but it protects our surfaces. Which is definitely important on granite counters but also important on tile counters because grout is super porous.
    We have a large tub 'deck' which is super handy, but it always looked messy because we would (meaning I would, Lee has one bath product beside the tub . . . it's called soap) leave all my bath products around the tub deck. I found this round tray at Superstore and it fit with about 2 cm to spare! It's perfect!!!

    I don't have many bath products, a special exfoliating mask (from the dermatologist, I have sensitive skin), an organic skin cleanser made by Boots (found at Target), and some extra soap because getting out of a warm tub to get a new bar of soap sucks!
    Oh and of coarse Fresh Flowers . . . I bathe daily beside fresh flowers, me, Oprah and the Queen have so much in common ;) hehe just kidding.


    Now a little bit about the bathroom layout and the rest of Master Bath Redo plans.
    This half of our bathroom is made up of the TUB and the Shower. The shower is AWESOME, I always thought that a shower bathtub combination was A-Ok but it was before I knew the joy of a separate shower, it's . . . it's just plain awesome. There is so much more room, I know it's not always possible to have a separate shower but if it is I would definitely put one in again.

    Now onto something I would never put in again (Note: this was a builder choice NOT ours) a two person TUB! Never again!
    First It's a HUGE pain to clean! I have to take off my socks, roll up my pants and clean the tub while standing in it!
    (Please excuse the color difference, I'm still figuring out the new camera, the picture on the right is how the tile actually looks ;) 

    Two it's a HUGE waste of water, I'm a bath person, so to have a bath in this tub by myself is a BIG waste of water. I guess maybe it depends on how much you bathe with your spouse but I definitely wouldn't recommend a two person tub!

    So what's left:
    -Artwork or something to hang over the tub, maybe a mirror.
    -New Towel bars, toilet paper dispenser, and hand towel holder
    -Some hooks for wet towels
    -New toothbrush holder
    -Some Serious cabinet organization
    -New light over the mirror and sink
    &
    -Maybe a new light fixture above the tub.
    -And one day in the far far future I would like to replace our giant mirror with a round multifaceted mirror!!

    So that's where we are so far in the Master Bath. I'm hoping to have the rest of it done by MONDAY! But so far I am LOVING the Sharkey Grey wall color, everything looks so much  nicer and sparklier  against the grey!
    Posted by Maillardville Manor at 3:48 AM 13 comments
    Email ThisBlogThis!Share to XShare to FacebookShare to Pinterest
    Labels: Flowers on Friday, Master Bedroom

    Thursday, July 28, 2011

    Personalizing Ikea Wardrobe!

    Since me and my shoes kicked Lee out of the Walk-in, he needed a wardrobe! Something large enough to hold his entire (XXL) wardrobe but something that didn't stick out like a sore thumb!

    We picked the Ikea BOTNE wardrobe because it was large enough, because it was simple and because we could personalize it.
    It started it's life with us looking like this:

    Then we added some rub-on numbers. I picked them up from Home Depot they were around $2 each and they were intended as Address Numbers!

    Then we added some door handles also from Home Depot.

    **The baskets on top are our laundry baskets. They are from JYSK.

    Posted by Maillardville Manor at 4:56 AM 22 comments
    Email ThisBlogThis!Share to XShare to FacebookShare to Pinterest
    Labels: Decorating, Master Bedroom, Organize: Bedroom

    Thursday, July 21, 2011

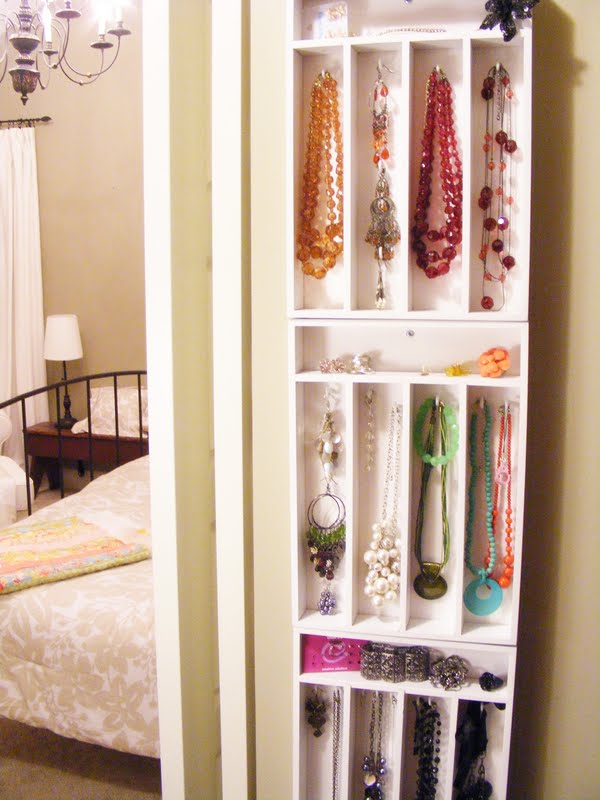
    Cutlery Tray for Jewelry!

    I LOVE Jewelry, real jewelry, costume jewelry, all of it . . . almost as much as I love shoes!

    I have a small jewelry box for my "real" jewelry. As much as I'd love to fill a wall with gold and diamond jewelry, we can't afford that :( so as far as my real items go, I only own the classics. A small pair of diamond studs, a pair of peal earrings, a pearl necklace, a cocktail ring, a couple of white gold bands, and of coarse my wedding band and engagement ring!!

    But it wasn't my "good" jewelry I was having a hard time storing, it was my costume jewelry I couldn't make room for! There's nothing I love more than a great long necklace to complete a look but, what I had was a tangled mess of chains and beads.

    So while at walmart, I found some bamboo cutlery trays for $10 each! I grabbed 3!! Along with a pack of rubber coated hooks, and a can of white spray paint!
    First:
    My dad sprayed each of the trays white for me, while Lee worked on his car, kind of a work share program those two have going on :). It took 2 coats each, adding up to almost 2 cans of spray paint!

    Second:
    I decided on what jewelry I wanted where and Lee started screwing in the hooks, which immediately cracked the back panel. Bamboo is a very hard wood so it won't expand to accommodate the size of the hook's screw. So he had to drill pilot holes before screwing the hooks in . . . a bit more trouble but it worked!


    Last:
    We screwed the tray to the wall using an anchor and a screw (super simple).

    I organized my jewelry by color, and style. I seem to have a lot of black jewelry so it all got grouped together.

    Then I stored my brighter more colorful jewelry together,

    and then my earth tone jewelry together.

    I also have a few LONG necklaces so we installed some hooks off the bottom to hang them!!!


    Total Cost:
    $10 each for cutlery trays  $30
    1 can of spray paint (I had a leftover can in the garage already) $5
    2 boxes of rubber coated hooks $3 each       $6
    _______________________________________
    $41


    p.s. Sorry I could snap a better far away shot . . . it was very cramped in my little walk-in :)

    Linking to:
    The Lettered Cottage
    Posted by Maillardville Manor at 4:58 AM 101 comments
    Email ThisBlogThis!Share to XShare to FacebookShare to Pinterest
    Labels: Master Bedroom, Organize: Bedroom, Organizing
    Home
    Subscribe to: Posts (Atom)

    LinkWithin

    Related Posts Plugin for WordPress, Blogger...
    Advertise with IZEA Media

    Enter your email address:

    Delivered by FeedBurner


    stacey ann
    ~ ~ ~ ~ Open Floor Plan ~ ~ ~ ~
    For more Orthopaedic Mattresses
    ~~~~~Visit this website~~~~


    Cutlery Tray for Jewelry!
    I LOVE Jewelry, real jewelry, costume jewelry, all of it . . . almost as much as I love shoes! I have a small jewelry box for my "re...
    Homemade Cleaners: Green Cleaning Recipes
    Since we started making our own Laundry Soap it only seemed natural to start making our own cleaners too. Not only for the natural aspect o...
    Bookcase Tutorial
    I LOVE built ins. I Can't afford Built-ins. But, I do have a husband and he's willing to work for food :) Here's how we turned ...
    Billy Bookcase all trimmed out!
    I love to read and as soon as you enter our home you can tell. The first thing you see on our main floor is all of my books. We use Ikea Bi...
    Slow Cooker Asian Garlic Chicken
           Since the arrival of Hudson in our lives . . . I have been cooking with either the phone (i.e. takeout) or the slow cooker. :) I thin...
    Also Featured Here!

    Promotional Codes

    • Shop Top Brands
      • Murad Coupons
      • Aliexpress
      • Pottery Barn Coupon Code
      • etnies Online Coupons
      • Famous Footwear

    • ▼  2014 (7)
      • March (7)
    • ►  2013 (99)
      • December (1)
      • November (2)
      • October (6)
      • August (4)
      • July (5)
      • June (9)
      • May (14)
      • April (19)
      • March (13)
      • February (13)
      • January (13)
    • ►  2012 (215)
      • December (14)
      • November (13)
      • October (18)
      • September (16)
      • August (17)
      • July (20)
      • June (20)
      • May (20)
      • April (18)
      • March (21)
      • February (19)
      • January (19)
    • ►  2011 (229)
      • December (11)
      • November (16)
      • October (18)
      • September (18)
      • August (22)
      • July (23)
      • June (16)
      • May (20)
      • April (20)
      • March (29)
      • February (19)
      • January (17)
    • ►  2010 (155)
      • December (17)
      • November (8)
      • October (13)
      • September (27)
      • August (24)
      • July (26)
      • June (40)


    • Breakfast
    • Lunch
    • Dinner
    • Beef
    • Chicken
    • Pork
    • Fish
    • Vegetarian
    • Dessert
    • Kitchen
    • Living
    • Office
    • Bedroom
    • Bathroom
    • Laundry
    • Garage
    • Flowers
    • Lawn
    • Vegetables
    • Valentine's
    • St. Patrick's
    • Easter
    • Thanksgiving
    • Halloween
    • Christmas
    • New Year's